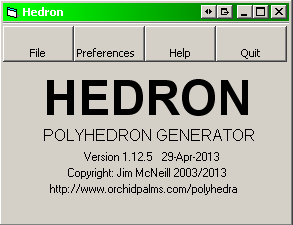
HEDRON - Polyhedron Generator
V1.12.0
Help File
Contents
---------------------------------------------------------------------------------------------------------------------------------------------------------
Note: Changes to this file since V1.11.0 are highlighted in red,
Existing HEDRON users wishing to upgrade to V1.12.0 may obtain a copy on request.
The above image shows the introductory screen of HEDRON. From this screen the user can choose to select files for processing or to amend their preferences as to how HEDRON runs.
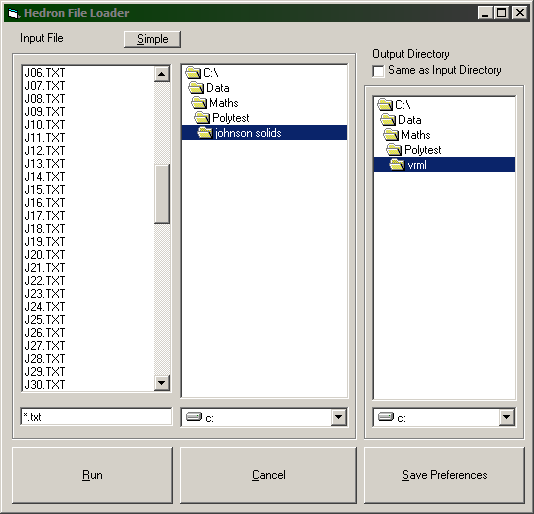
Choosing "File" on the introductory screen leads to the above file selection screen. The left and middle columns define the input file, the right column defines the directory in which the output files will be stored. A check box (upper right) allows the output directory to be set to equal the input directory.
HEDRON can generate its own input for some simple polyhedra. Selecting "Simple" on the file input screen will display the Predefined Input screen.
Pressing "Run" will display the Runtime Options Screen.
Pressing "Save Preferences" will take you to the User Preferences Screen. Pressing 'OK' on this screen will then save your preferences including your directory preferences on the above screen.
HEDRON takes as its input the net of the required polyhedron (in similar format to the CoordIndex section of a VRML file. There are a couple of twists involving star polygons and temporary connections (see below).
Input files should be generated as unformatted text in any text editor and stored with the extension "txt".
Comments can be entered on any line following an apostrophe ( ' )
A sample input file (for a cube) would be as follows. Each line defines the four vertices of a square. Note the curly brackets and the need for the comma at the end of every line).
{ 'comment can go here: start of input
0,1,2,3,-1, 'this is face 1, vertices 0 1 2 and 3
4,5,6,7,-1,
0,1,5,4,-1, 'another comment
1,2,6,5,-1,
2,3,7,6,-1,
3,0,4,7,-1,
} 'end of input
The Hedron Library is available. This is a zip file containing a series of input files covering the Platonic and Archimedean polyhedra, Johnson Solids, simple Stewart toroids and all of the examples from this help file.
HEDRON will also accept a line x,x,x,x,x,x,-d, where the "x"s are the vertices of the required polygon and "-d" is the desired denominator of a star polygon of the form {n/d}. For example, to generate a {7/2}-gon simply enter the line "0,1,2,3,4,5,6,-2,". For normal polygons simply enter the vertex numbers followed by "-1,". The current upper limit for polygons is {n/d} with 3<=n<=40, 1<=d<=12 and with n and d co-prime. Within these limits, polygons can be entered as n/(n-d), this makes no difference to the processing but the functionality of setting local convexity separation for a specific polygon can then be used to distinguish between them. So, for example if a polyhedron contains two distinct sets of triangles with differing convexity regimes, one set can be entered in the form "x,x,x,-1," and the other set in the form "x,x,x,-2,".
HEDRON will also look for possible input of {5/2}, {8/3} and {10/3}-gons where the original polygon has been tri-angulated (this will be the case if you have copied the CoordIndex section from a VRML file). If it finds 5, 8 or 10 successive triangles with the same first co-ordinate, HEDRON will ask whether these should be collapsed into the respective star polygon.
Do not use -d identifiers other than -1 for non-regular faces. Complex faces, such as {10/2} where n and d are not coprime, have not been implemented.
Individual polygons, vertices and edges can also be flagged in the input for special processing. The identifier is simply a character inserted somewhere in the input line for the polygon, vertex or edge before the final comma. Note that these identifiers are case sensitive
C:
Identifies this vertex as one to be used in determining the centroid
of the polyhedron
F:
Orient the output so that the defined vertex or vertices are at the front
R: Orient the output so that the defined
vertex or vertices are on the right
T: Orient the output so that the defined
vertex or vertices are at the top
V: Highlight the vertex with a small
sphere. See User Preferences Screen.
v: Identifies
the vertex as the specified vertex of a rhombus
*: Draw edge cylinders on
all edges adjacent to the vertex
The C identifier is used when the polyhedron is to be centred on a point other than the centre-of-gravity of all vertex points. If used, exactly four vertices (which must not be coplanar) should be identified with a C. The polyhedron will be positioned such that all four such vertices are equidistant from the origin.
The V identifier can be used against any vertex or vertices. If all vertices are to be highlighted, use the check box on the RunTime Options Screen.
The v identifier can be used with or without a forced vertex angle. With a forced vertex angle, the entered figure is always used on the defined vertex. Without a forced vertex angle, HEDRON will attempt to put the acute angle of each rhombus against the defined vertex.
The F R and T vertex identifiers are used to determine the rotation of the output polyhedron. As an example, this input file will produce a cube with vertex 0 at the front (F) and vertex 1 directly above it (T) with vertex 2 to the right (R).
{
0F,1T,2R,3,-1,
4,5,6,7,-1,
0,1,5,4,-1,
1,2,6,5,-1,
2,3,7,6,-1,
3,0,4,7,-1,
}
If the identifier is entered against more than one vertex, then the following processing takes place: If an identifier is placed against two vertices then the line containing the vertices is defined and the point on this line closest to the origin is used for alignment. Similarly, if an identifier is placed against three vertices then the plane containing the vertices is defined and the point on this plane closest to the origin is used for alignment. Only the first three occurrences of an identifier are used. Choose both ends of an edge to align against an edge, choose three vertices in a face to align the face - if possible choose three vertices spread around the polygon rather than three adjacent vertices. Note that more than one identifier can be entered against a vertex, but each identifier should only be entered against a vertex once.
A more complex example is this excerpt showing a pentagram set as the front face with edge 0-1 to the top and vertex 1 to the right:
{
0FT,1TR,2F,3,4F,-2
...
Vertex identifiers can be entered before or after the required vertex number.
If more than one segment is defined, then the "flip" options on the Segment Options screen allow the F T and R identifiers to be used as 'back', 'bottom' and 'left' identifiers respectively.
A note on the prioritisation of these vertex identifiers. The first priority is to rotate the polyhedron such that the plane containing the F vertices is at the front (i.e. it lies on the z-axis pointing toward the viewer. The polyhedron is then rotated around the z-axis to place the centre of the T vertices on the x=0 plane with a positive y co-ordinate. Finally a reflection is performed (if necessary) to give the R vertex a positive x co-ordinate.
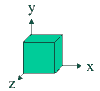
The directions HEDRON uses for its x y and z axes are illustrated below.
These force special processing for the face in question.
A:
Augment the polygon by replacing it with a pyramid.
B: Blank the polygon, i.e. use it
while generating but do not copy it to the output file
D: Diamond. Identifies the
face as a rhombus or a
distorted hexagon, type 1.
(See here)
d: Diamond.
Identifies
the face as a rhombus or a distorted hexagon,
type 2.
E: Highlight edges ('or'
option). All edges of the specified polygon will be drawn in the highlight edge colour.
e: Highlight specific edge ('and'
option). Enter against both faces adjacent to the required
edge.
This will force that edge to be drawn with the highlight edge colour. See note below.
f: Forces the polygon to be
displayed as a frame in all output files.
N: Non-regular
face. Ignore during generation but print to output file - not
triangulated..
n: Non-regular face.
Ignore during generation but print to output file - triangulated.
O: Draw cylinder over edges ('or'
option). All edges of the specified polygon will be highlighted
with a cylinder.
o: Draw cylinder over edges ('and'
option). Enter against both faces adjacent to the required
edge. See note below.
q: Diamond. Identifies the face as a rhombus, type 3.
s: Forces the polygon to be displayed solid
in all output files
t: Forces
the polygon to be displayed translucent (with an opaque frame)
in all output files
Note that identifiers 'e' and 'o' have been superseded by the edge identifiers. However, they are still operable in order to provide backwards compatibility
These force the face to the desired colour and over-ride all other colouring options.
a: amber (orange)
b: blue
c: cyan
g: green
h: highlight colour
m: magenta
r: red
w: white (pale grey)
y: yellow
As an example, this input file (originally a cube) will produce a "cube" with one face augmented and the opposite face missing. Selected faces are forced to red, blue and green. Note the precise position of the letters is not important so long as it is before the final comma. .
{
0,1,2,3,A-1, ' A means augment this face
4,5,6,7B,-1, ' B means this face is a blank. It will not be written to the output
0,1,5,4,-1,
r 1,2,6,5,-1, ' r means display this face in red
2,3,7,6,g-1, ' g means display this face in green
3,0b,4,7,-1, ' b means display this face in blue
}
This second example shows the use of the f s and t identifiers on a dodecahedron.
{
rs 2,7,4,1,0,-1, 'this face and its opposing one are coloured red and forced to solid
bf 3,9,6,2,0,-1, 'this face and its opposing one are coloured blue and forced to frames
yt 0,1,5,8,3,-1, 'this face and its opposing one are coloured yellow and forced to translucent
1,4,10,11,5,-1,
2,6,12,13,7,-1,
3,8,14,15,9,-1,
4,7,13,16,10,-1,
11,17,14,8,5,-1,
6,9,15,18,12,-1,
yt 18,19,16,13,12,-1,
bf 16,19,17,11,10,-1,
rs 17,19,18,15,14,-1,
}
The effect of these identifiers in all HEDRON's output files can be seen here: solid, frame, switchable, animated. In all cases the default green faces are the ones with no face identifiers. Note that f and s cannot both be used on the same face. Note that the t identifier includes an implied f so that t and s can also not be used on the same face.
This third example goes back to a cube. In this case, alternate vertices of the cube have been connected to create a tetrahedron. This highlights the use of the N identifier as the triangular faces are in this case considered to be non-regular as they have an edge length of sqrt(2). Note that the other face and vertex identifiers can be used on the non-regular faces.
{
f0,1,2,3,-1, 'f means these faces remain as frames
f4,5,6,7,-1,
f0,1,5,4,-1,
f1,2,6,5,-1,
f2,3,7,6,-1,
f3,0,4,7,-1,
rN0,2,5,-1, 'r colours these faces red
rN2,7,5,-1, 'N means these are non-regular faces
rN0,5,7,-1,
rN0,2,7,-1,
}
This fourth example is a pentagonal cupola. The source file is not given, but in both cases the decagonal face has been blanked (with a 'B') and replaced with a non-regular decagon taking alternate pairs of vertices. The two examples highlight the difference between the 'N' identifier (here) and the 'n' identifier (here).
Note also that vertex and face identifiers can be mixed in a single input file.
L: Line
segment: see segmentochora
P: Point segment: see
segmentochora
X,Y and Z: Polygon
orientators: see segmentochora
A number of face identifiers (e,E,o,O) and one vertex identifier (*) serve as edge identifiers, however edges can also be identified for special processing by changing the punctuation mark entered between the two vertices in the input line for the polygon:
; (semi-colon): Draw the
edge with the highlight edge colour.
\ (back-slash): Draw cylinder (1st set) over edge
/ (slash): Draw cylinder (2nd
set) over edge
To highlight the edge between the first and last listed vertices on a face, change the punctuation mark after the last vertex.
Example:
{
0,1,2;3,-1, 'Square face with the edge between vertices 1 and 2 drawn with the highlight edge colour
4,5\6,7,-1, 'Square face with a cylinder on the edge between vertices 5 and 6.
0,1,5,4\-1, 'Square face with a cylinder on the edge between vertices 0 and 4.
1,2,6,5,-1,
2,3,7,6,-1,
3,0,4,7,-1,
}
Edge identifiers can be mixed on the same input line and can be mixed with vertex identifiers and face identifiers.
Edge identifiers can also be used on non-regular faces ("N" or "n" face identifiers) and in segmentochora faces but not on inter-realm links.
Temporary connections can also be entered between vertices (I call these 'bands'), these get used in the global inflation phase to force vertices together, the bands are then ignored as the model settles into its final shape. To put bands in the input, just list the two vertices followed by a -1 after all the normal polygons have been input. (see this input file for a 5-5-4 acrohedron near miss for an example). If HEDRON detects bands in an input file the user will be offered the option of setting a band length on the runtime screen. Note that these bands have no effect under the local inflation options.
Links are here for sets of input data for the uniform polyhedra, Johnson Solids and on request other polyhedra featured on the site. Alternatively, extract the CoordIndex section from a VRML file and put curly brackets {} around the vertex information.
HEDRON can cope with input files that contain more than one polyhedron. Simply enter the polyhedra one after the other each with their own curly brackets. Up to five polyhedra are allowed. The user can then also access a screen which allows them to scale and translate each polyhedron. See the Segments Options Screen, each polyhedron is a segment. If more than one polyhedron is detected in the input then only a frame file is output.
The default colouring option for compounds is to produce each segment in its own colour. The Segments Options Screen contains an option to use HEDRON's normal colour per face method.
Example compound input, a cube and a tetrahedron:
{ 'cube
0FTR,1FT,2F,3F,-1, 'face 1 to the front with vertices 0 and 1 to the top, vertex 0 to the right
4,5,6,7,-1,
0,1,5,4,-1,
1,2,6,5,-1,
2,3,7,6,-1,
3,0,4,7,-1,
}
{ 'tetrahedron
2,1T,0F,-1, 'vertex 0 to the front and vertex 1 to the top
3,2,0,-1,
0,1,3,-1,
1,2,3,-1,
}
HEDRON will by default assign each co-ordinate a random starting position. This can be over-ridden by giving HEDRON starting co-ordinates to work from. These should be entered as triplets of comma separated numbers in a set of normal brackets " ( ) " before the closing curly bracket for the segment in question. This trivial example shows a cube:
{ 'cube
0,1,2,3,-1,
4,5,6,7,-1,
0,1,5,4,-1,
1,2,6,5,-1,
2,3,7,6,-1,
3,0,4,7,-1,( 'starting co-ordinates
0.5,0.5,0.5, 'starting co-ordinate for vertex 0
-0.5,0.5,0.5, 'starting co-ordinate for vertex 1
... etc
)}
HEDRON can also be forced to output the polyhedra with
these precise co-ordinates, this is done checking the Write from Input
Co-ords on the RunTime Options Screen. This
can be useful when using HEDRON as a post-processor to generate
VRML files for polyhedra such as this Szilassi
polyhedron.
3.7 Rhombi and Distorted Hexagons
HEDRON can recognise two forms on non-regular polygons.
Any four sided face in a HEDRON input file containing a "D", "d" or "q" face identifier will be identified as a rhombus. Those containing a "D" will be identified as set 1, those with a "d" as set 2 and those with a "q" as set 3. Each set will be individually processed. HEDRON will attempt to resolve the rhombi in each set such that they are similar, i.e. they contain the same internal angles. The resulting acute angle within each set of rhombi will be written into the output VRML files.
The colour of each set of rhombi can be individually controlled on the Colour Preferences Screen, and the internal angle can be forced to a particular value on the RunTime Options Screen.
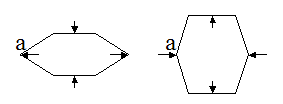
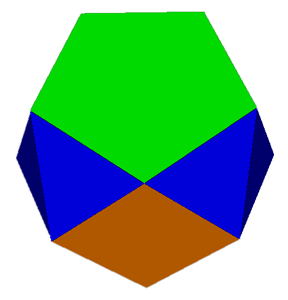
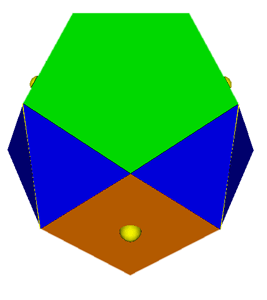
HEDRON can process a particular form of distorted hexagon. These hexagons, as illustrated above, have the properties that all edge lengths are equal, the faces appear in 3 parallel pairs and all diagonals cross at the centre. They could be thought of as squashed or stretched hexagons. They are identified in the input file as any six sided face containing a "D" or "d" face identifier. Non-convex forms are not supported. See here for application.
In similar fashion to rhombi, they can be split into two sets which will be processed individually. The output VRML files will contain the 'apex angle' (a) of each set. The colour of each set can again be controlled on the Colour Preferences Screen. Internal angles cannot be forced.
In order to prevent the situation where distorted hexagons produce too much flexibility when iterating to a solution, there is an option on the RunTime Options screen to treat these as regular hexagons during the first part of the iteration.
Rhombi and distorted hexagons can both be present in an input file, there is no relationship between the sets.
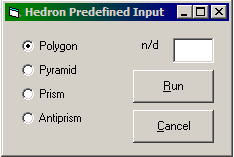
If the required polyhedron is a single polygon or a simple pyramid, prism or antiprism, HEDRON will generate its own input. Simply check the required polyhedron and enter a value for the base polygon in the n/d box. The format of this entry is a plain number (e.g. 5) for a standard polygon or n/d format (e.g. 5/2) for a star polygon. The upper limit for polygons is n=24 and d=8.
Pressing "Run" will display the Runtime Options Screen
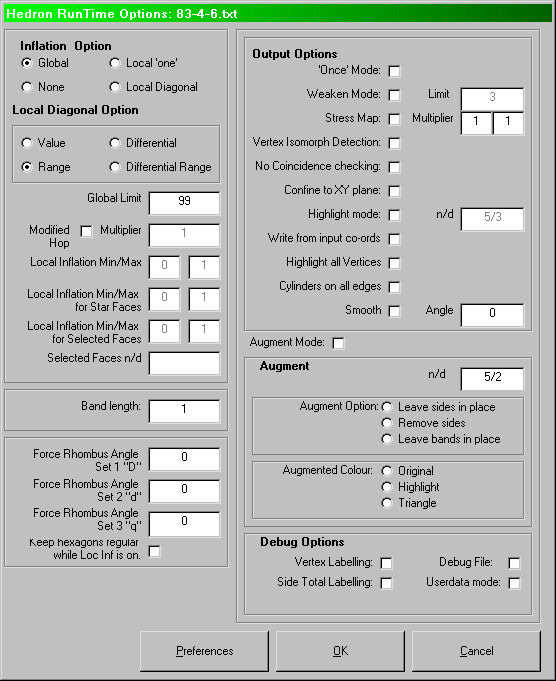
This is the most convoluted of HEDRON's screens and it is here that the user can make selections over how HEDRON will generate the required polyhedron. However, in a large number of cases, the default settings will work perfectly well. If you are new to HEDRON then just press OK on this screen.
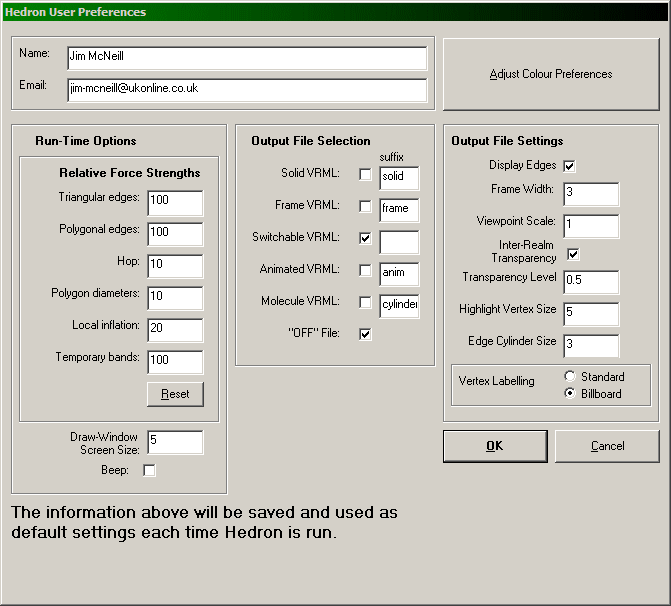
Pressing the Preferences box will invoke the User Preferences screen. Changes made to that screen when accessed from the above screen will apply to this run only. The user's default settings will not be updated.
Inflation is a term used here to denote how neighbouring faces in a polyhedron relate to each other and is a vital aspect of how HEDRON generates polyhedra. The two main options are global and local inflation, although an option is supplied to switch inflation off completely.
Following an inflation phase, the inflationary force is then removed and the model is allowed to relax (hopefully) to a regular form.
If Global Inflation is chosen, HEDRON uses a Hop algorithm to force vertices apart. An attempt is made to push vertices apart such that the distance between them is proportional to the number of edges that must be traversed to travel between them. Global Inflation is the best method for generating all convex polyhedra.
A Global Limit can also be entered, this is an upper bound for the Global Inflation algorithm. If the number of edges that must be traversed to travel between two vertices is more than the Global Limit then no inflation force is applied between these two vertices.
The 'Modified Hop' algorithm can be used to finely control the processing of the Hop algorithm. Whereas the Hop algorithm attempts to push the vertices to a distance e apart, where e is the minimum number of edges required to traverse between the vertices), the Modified Hop algorithm attempts to push the vertices to a distance of n.sqrt(e) apart, where n is the Modified Hop Multiplier. This option is useful for models such as triangulated domes where the original Hop algorithm tends to force the model into a near spherical shape.
For all forms of local inflation, HEDRON takes two edge connected faces and tries to set the distance between their centres.
This is a fairly crude implementation of local inflation, regardless of the size of each face, HEDRON tries to force their centres to be one unit apart. It can be surprisingly effective for a large number of polyhedra.
This form of local inflation takes account of the relative sizes of two neighbouring faces. A factor can also be entered, this determines the required separation of the two centres. A separation factor of zero would try to force the two faces to be superposed (with a shared edge), a factor of 1 would try to force the faces to be coplanar with a dihedral angle of 180 degrees. Between 0 and 1 is a linear interpolation between the two distances, so a factor of 0.7 would mean a dihedral angle of about 90 degrees. A factor > 1 is admissible and is sometimes useful where neighbouring faces are nearly coplanar.
With Local Diagonal checked a sub menu is activated allowing a range of values to be entered for this separation factor
Value: A single value for the separation factor is applied to all edges.
Range: Upper and lower limits are entered, successive iterations use a separation factor randomly selected between these bounds.
Differential: Different values can be entered for the separation factor depending on whether the edge is (a) between two standard faces (i.e. non starred), (b) neighbouring at least one starred face, or (c) neighbouring a face of a defined size (as entered in the Select Face box).
Differential Range: Bandwidths can be entered independently for each of the three classes of edges given above.
If HEDRON detects temporary bands in the input file, the user is prompted here for the desired band length, These bands are used during the global inflation phase and then removed before the final relaxation of the polyhedron. Bands have no effect on local Inflation.
If rhombi are defined in the input file, the user has the option here to force these rhombi to have a defined internal angle. Either the acute or obtuse internal angle can be entered in degrees, zero means no forcing is applied. There are also some special entries as follows:
r12: The internal angle of the faces of the Rhombic Dodecahedron
r30: The internal angle of
the faces of the Rhombic Triacontahedron
mr30: The internal angle
of the faces of the Medial Rhombic
Triacontahedron
pn: The
internal angle of an n-gon. eg p7 for the
internal angle of a heptagon
pn/d: The internal
angle of an n/d-gon. eg p5/2 for the internal
angle of a pentagram
'Force rhombus angle type 1 "D"', 'Force rhombus angle type 2 "d"' and 'Force rhombus angle type 3 "q"' can both be entered independently.
To force the defined angle to be used on a specified vertex, use the "v" vertex identifier
There is a potential conflict in using this both option and Global Inflation. If having the rhombi as squares is a valid solution then Global Inflation will force the rhombi to be squares, the Force Rhombus Angle option is then not capable of breaking this symmetry. In such cases, one of the Local Inflation options is recommended.
5.3.1 Keep hexagons regular while Loc Inf is on.
Where an input file contains distorted hexagons, there are occasions where the flexibility of the hexagons allows to much freedom during the iteration. With this box checked, such hexagons are treated as regular hexagons during the Local Inflation phase and only allowed to distort in the latter stages of the iteration.
This button appears if the input file contains more than one segment. Pressing it leads to the Segment Options screen.
Once Mode. This is used to restrict HEDRON to only producing one polyhedron. Many polyhedra have isomorphs (different polyhedra sharing the same net, for example the icosahedron and great icosahedron). Usually once one isomorph is generated, HEDRON will start again and attempt to generate another. Using this keyword switches off this functionality. On writing the first isomorph a message is given and the user is returned to the introductory screen. Once mode should also be used when generating 'near-miss' polyhedra.
Weaken Mode. This should be used in conjunction with Once Mode (above) when the polyhedron being generated does not contain regular faces, i.e. a "near-miss". HEDRON will attempt to generate the polyhedron with all edges of equal strength, it will then repeatedly weaken certain edges. The result will be to confine the distortion to certain faces. Convention in generating distorted polyhedra appears to be to confine the distortion to the smallest faces. If the "Weaken" box is checked the user is required to enter a "Weaken Limit". Any edge between two polygons with sides not exceeding the Weaken Limit will be gradually weakened. (These edges are set to use Force 1, the "Less F1" and "More F1" command buttons can be used to affect progress in this case).
Stress Map. This option may be used for "near-misses". With this option selected, edges which are not unity and faces which are not regular are highlighted using stress cones and spheres. See the section on Stress Maps for more detail. The two input boxes following 'Multiplier' allow for the cones and spheres respectively to be independently exaggerated by multiplication factors. Cone and sphere colours can be controlled via the User Preferences Screen. The stress cones and spheres will appear in the solid, frame, switchable and animated output files. 'Stress Map' will usually be used in conjunction with 'Once Mode' and 'Weaken Mode'. The 'Stress Map' files are written alongside a set of normal 'un-stress mapped' files (prior to v1.11.0 they required a separate run).
Vertex Isomorph Detection. This uses improved isomorph detection, which allows for differentiation between isomorphs that are similar but differ in vertex configurations. For example, imagine an icosahedron with one vertex inverted (here). HEDRON will normally find only one such example, however with this box checked HEDRON will find 12 examples, one for each vertex inverted.
No Coincidence Checking. HEDRON normally rejects polyhedra with coincident vertices. Checking this box switches off this check.
Confine to XY Plane. Checking this box will force the Z co-ordinate of all vertices to zero. This is used in generating planar degenerate figures or tessellations.
Highlight Mode. Checking this box will over-ride default colouring for a selected polygon type as entered into the n/d box. Checking the box and setting n/d to 0 will highlight all polygons. This is a useful way of generating a mono-colour polyhedron in the colour of choice.
Write from Input Coords. Checking this box will force HEDRON to write output files directly from the given starting coordinates without processing. This will normally suppress any distortion reporting, however if the Userdata check box is also selected then distortion statistics are produced.
Highlight all Vertices: Checking this box will draw spheres at all vertex locations. It is equivalent to entering a 'V' vertex identifier against all vertices. See User Preferences Screen for options.
Cylinders on all Edges: Checking this box will draw edge cylinders on all edges. It is equivalent to entering an 'O' face identifier against all faces. See User Preferences Screen for options.
Smooth: Checking this box will insert code in the VRML file to smooth edges in the resulting polyhedron if the deficit in the dihedral angle is less than the 'Angle' specified (in degrees) in the box to the right. This uses the VRML 'creaseAngle' function.
Checking the "Augment" box allows the user to define a particular type of polygon in the input (e.g. triangles, squares etc). On generation this polygon will be replaced by pyramids. This feature also works for star polygons.
With this box selected the user will be required to choose whether the base polygons should be left in place, used as a frame (i.e. used during the generation of the polyhedron to keep the pyramid from flexing) or removed (to allow the pyramid to flex). HEDRON will allow the colour of the output pyramid to be set to any one of: highlight (yellow), normal triangle colour (blue) or the colour of the base polygon.
Individual faces can be set to augment by entering an "A" somewhere in the input line for the polygon before the final comma - see Input File Format. HEDRON will automatically detect these in the input file and request augment options to be made.
If an augmented file is produced, the term '_aug' is appended to the file name.
Vertex Labelling. If this box is checked then any written VRML file will have the vertices labelled. Note that HEDRON is able to handle skipped vertices in the input but the vertex numbers in the output files will be sequential. Vertex labelling is available in one of two forms, Standard and Billboard. The selection is made on the User Preferences screen.
Side Total Labelling: With this box checked the output VRML will contain labels in the centre of each face relating to the sum of the vertices of the face.
Debug File. Checking this will cause an additional file (myfile_debug.txt) to be written to the output directory. This contains information on the internal database that HEDRON has generated from the input file. It is useful at times to trace errors in the input file.
Userdata. Checking this box puts a record of all HEDRON settings and user selections into the output file.

This screen is where HEDRON displays its attempts to draw the polyhedron. The lines drawn are colour coded with red lines being closer to the user and blue lines further back. In normal mode, HEDRON will generate one example of the polyhedron and then attempt to generate isomorphs. You can set the zoom level in this window by amending "Screen Size" in the User Preferences screen.
The control buttons along the bottom of the screen act as follows:
Quit: Stop processing, return to the Introduction screen without writing output files.
Write: Write output files and return to the Introduction screen
Re-do: Abandon the current iteration without writing output files and try again.
Re-Load: Abandon the current run and re-load the input file.
Graphics: Toggles graphics on and off. Switching graphics off increases processing speed.
More F1: Increase the strength of Force 1
Less F1: Decrease the strength of Force 1.
The difference between Re-Do and Re-Load is that Re-Do just starts the next iteration, whilst Re-Load goes back to the input file and starts again. This allows the user to incorporate changes made to the input file without cycling through the option screens, any isomorph history is lost.
![]()
HEDRON also displays the name of the input file and the number of the isomorph being generated on the task bar.
Whilst it is generating a model, HEDRON displays two numbers at the top left of the screen. The first is the edge deformation (see 1-dimensional processing) this is the sum of the errors in all the edge lengths. The second number is the polygonal deformation (see 2-dimensional processing), this is the sum of the error in all of the polygon diagonals. As a rule of thumb, unless you are deliberately generating a model you know to be distorted, you should aim to get both of these numbers down to the last decimal place (two for some large models).
HEDRON's output is a user defined selection from a number of VRML files:
If an input file called myfile.txt were chosen, the output files would be
myfile.wrl
A solid model of the polyhedron
(with star faces triangulated). Example.
myfile_frame.wrl
A "frame"
model where the edges are given a small width in the plane of the
polygon. The centre of the polygon is left hollow. Example.
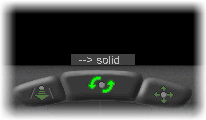
myfile_switch.wrl
A "switchable" model. Clicking on the
button displayed in the lower centre of the screen will switch between
solid, translucent and frame views. Example.
The image below shows the appearance of the switching button in the
Cosmo viewer. The button can only be used in the default "Wide
Angle" viewpoint.
myfile_anim.wrl
An "animated" model where the polyhedron gradually
'morphs' between solid and frame views. Example.
myfile_molecule.wrl
A "molecule"
model, reminiscent of those molecular modelling kits where the vertices
are shown with spheres and the edges with cylinders. Example.
If HEDRON generates more than one isomorph of a polyhedron, successive isomorphs are given files myfile_isom2.wrl myfile_isom3.wrl etc (with _anim, _frame, _switch and _molecule qualifiers as appropriate). RunTime Options such as weaken mode, stress map, smooth and augment will also be reflected in the output file names.
The file suffixes shown above are the default values. These can be changed on the User Preferences Screen.
Each VRML file produced by HEDRON will contain a number of viewpoints:
The "OFF" file, (OFF stands for Object File Format), is an ASCII file which can be read by many rendering programs. More details on the file format are available here. HEDRON will name the output files myfile.off (with isomorph identifiers if necessary). The RunTime Option of weaken mode will also be reflected in the OFF file name.
HEDRON will also output an 4-D OFF file in certain circumstances for Segmentochora.
 |
 |
Stress Maps are a mechanism for displaying the distortion in a near-miss polyhedron. Take the two views above of a 5-5-4 acrohedron. The polyhedron is actually a near-miss but this is not particularly evident in a normal VRML file (left). With the stress map option used (right), distorted edges and faces are highlighted. Using the stress map option has no effect on a regularly faced polyhedron.
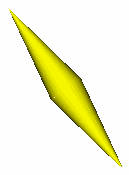
compressed edge |
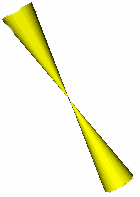
extended edge |
Distorted edges are shown in one of two ways. A compressed edge is shown as two cylinders base-to-base (left), an extended edge is shown as two cylinders apex-to-apex (right). The width of the bases is in both cases proportional to the extent of the distortion.
It is also possible for a face to be distorted beyond the distortion contained in the edges, for example a rhombus can be formed where all the edges are unity. In this case the 'polygonal distortion', being the sum of the distortion of the major diagonals of the polygon, is shown as a sphere in the centre of the polygon (see the images above). The radius of the sphere is proportional to the extent of the distortion.
The relative sizes of the cones and spheres can be adjusted on the Runtime Options screen. The colours used can be set on the User Preferences Screen.
Stress map cones and spheres are written to the 'solid', 'frame', 'switchable' and 'animated' output files. Stress maps have no effect on 'molecule' or 'OFF' format files. If a stress map is produced, the term '_stress' is appended to the file name.
7.2 Distortion
Where a polyhedron is a near miss, HEDRON will generate some
statistics for these models. These are presented below each image as a
triplet of numbers (E=?, P=?, A=?). For an
undistorted model, this triplet will read (E=0,P=0,A=0).
'E' is the sum of the distortions of all of the edge lengths
(assuming an edge length of 1)
'P' is the polygonal distortion, it is expressed as the sum of
the distortion of all of the diagonals across each polygon. For
polygons other than triangles, forms exist with all edge lengths 1
which are not regular (eg a rhombus).
'A' is the aggregate angular error. The absolute difference is
determined between the angle of a regular polygon and the angle in the
modelled polygon. These are summed for each angle in each polygon.
There are two ways in which these numbers can be read. 'E' and 'P'
are both measures of side distortion ('E' is edges; 'P'
is diagonals), there is an element of trade off between the two. An
approximation to the extent of the distortion is given by 'E+P'.
'A' is a standalone measure of distortion, and is an attempt to
quantify the 'nearness' of a near-miss in a single value.
Parameters can be set in HEDRON as to how the 'E'/'P'
trade-off is to occur. My own personal preference is to limit the
distortion to the smallest possible faces, this tends to reduce 'P'
at the cost of 'E'. 'A' is a derived value and cannot be
directly controlled, there is no processing in HEDRON to
specifically minimise 'A'.
These figures are written into the VRML files and
can be seen by accessing the VRML file with a text viewer. Information
is also given about the most distorted edge and the breakdown of 'E'
and 'P' across each edge and polygon.
A summary of the
distortion statistics, in the form (E=1.19, P=1.68, A=159°)
is also written into the VRML files.
If rhombi
are present in the polyhedron, then HEDRON will attempt to
make all the rhombi similar. The error values above will show the
distortion from the average value.
When this screen is accessed from the HEDRON introduction screen, the options set on this screen are remembered by HEDRON and used until they are changed again. When the "OK" button is pressed, HEDRON will also store the current input and output directories as defaults. When this screen has been accessed from the RunTime Options Screen, changes will apply to the next run only.
The Relative Force Strengths are used as follows, the default values work well in most cases but they can be changed:
Triangular edges (Force 1): Used for triangle-triangle edges, and in weaken mode for edges between two polygons at or below the weaken limit.
Polygonal edges (Force 2): Used for (non-triangle) polygon-polygon or polygon-triangle edges and in weaken mode for edges where one polygon is above the weaken limit.
Hop (Force 3): Used by the Hop algorithm in global convexity mode.
Polygon diameters (Force 4): Used to ensure that opposing vertices of polygons are the requisite distance apart (see 2-dimensional processing)
Local inflation (Force 5): Used for the forces between the centres of neighbouring polygons in local inflation.
Temporary bands (Force 6): Used for temporary bands in the input file.
The "Reset" button will return the forces to their default values (given above).
"Draw-Window Screen Size" will define the limit of the coordinates shown in the Draw Window Screen. This will show (x,y) coordinates from (-n, -n) to (n, n)
"Beep" simply means HEDRON will beep when writing files.
HEDRON will by default generate all 6 output files, any of which can be suppressed by unchecking the relevant box. If the file suffix is not blank, it is appended, with an underscore, after the input file name and before the '.wrl' file extension. (e.g. Frame VRML's would in the above case be called myfile_frame.wrl). Any valid character or characters can be used as a suffix.
The "OFF" file, (OFF stands for Object File Format), is an ASCII file which can be read by many rendering programs. More details on the file format are available here.
"Name" and "Email" are written in the output files to identify the modeller.
"Display Edges" checkbox if checked will draw lines in the VRML output files showing all the edges.
"Frame Width" determines the width of the frame edges as a percentage of the polygon width.
"Viewpoint Scale" affects the locations of the viewpoints in the output VRML files. The default value of 1 will optimise the size of the polyhedron on the screen (or the 1st segment in a multi-segment case). Numbers greater than 1 will move the viewpoints back and make the polyhedron appear smaller, numbers less than 1 will have the opposite effect.
"Inter-Realm Transparency" will make Realm Faces semi-transparent if checked.
"Transparency" defines the transparency level used in the output VRML files. The default value of 0.5 works well in most cases but can be changed if required.
"Highlight Vertex Size" defines the size of the spheres drawn to show highlighted vertices as a percentage of the edge length. Sizes > 20% are permitted but will receive a warning that such sizes highlight shortcomings in VRML's sphere node.
"Edge Cylinder Size" defines the radius of the cylinders drawn on specified edges as a percentage of the edge length.
Pressing the Adjust Colour Preferences button on the User Preferences screen leads to the Colour Preferences Screen
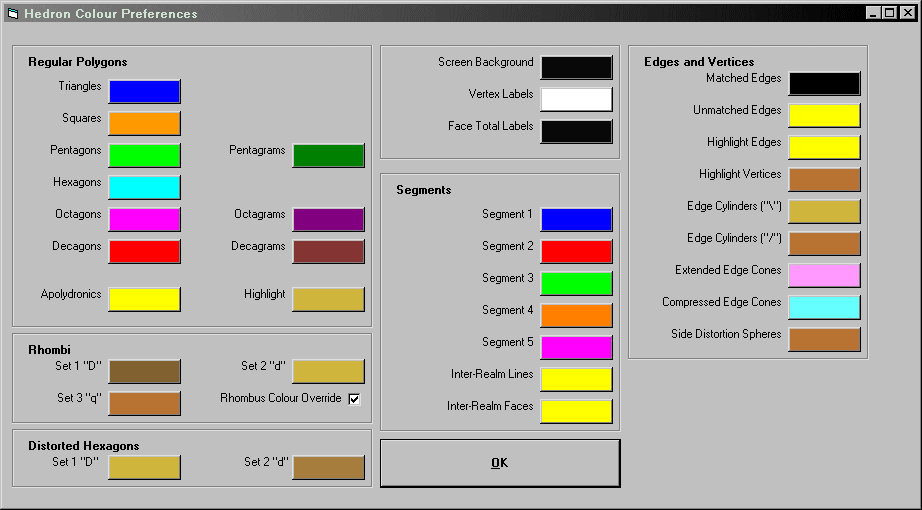
Most of the options are self evident. Press the coloured button to change a colour.
"Unmatched Edge" colour will set the colour for edges where one of the adjacent faces is blanked, this is useful for 'exploded' models such as this example. (Note that HEDRON does not distinguish between 'exploded' models and those with internal bracing, leave the "Matched Edge" and the "Unmatched Edge" colours the same for the latter case).
"Realm Lines" and "Realm Faces" are used in Segmentochora.
"Extended Edge Cones", "Compressed Edge Cones" and "Side Distortion Spheres" are used in Stress Maps.
"Rhombus Colour Override" checking this box will result in any input rhombi that have relaxed into square faces being output with the square colour. Where multiple sets rhombi have relaxed into similar rhombi then both sets are output with colour of the lower numbered set.
All face colours can be superseded by a colour identifier.
Pressing a colour button on the Colour Preferences Screen leads to the Colour Table Screen.
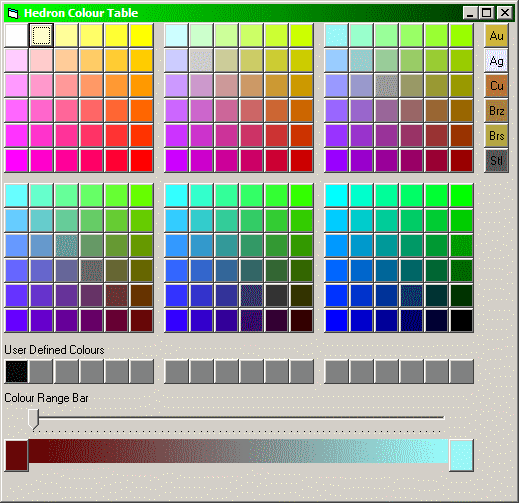
Just click on the required button in the upper section of the screen, note the sample of metal colours provided on the right.
Custom colours can be stored in the User Defined Colour section as follows:
1. Press the button to
the left of the Colour Range Bar.
2. Click on a colour to use as the start of your colour range.
3. Repeat this process for the button to the right of the Colour Range
bar
4. Move the slider to the desired interpolated colour
5. Press on one of the User Defined Colour buttons to store.
6. To use this User defined colour, just click it again.
Usage hint: Note on the screen above, the first user defined colour is set to 'not-quite-black', I use this for background. Graphics programs can then differentiate between this and the (real) black that I use for edges.
A selection in the Debug Options section of the Run Time Options Screen allows the user to specify that the vertices are labelled in the output VRML files. This can be a useful feature for debugging models or for drawing specific attention to certain features of the polyhedron. Vertices can be labelled in one of two ways. "Standard" mode, has the vertex labels lying 'flat' on the surface of the polyhedron (Example). "Billboard" mode keeps the vertex labels oriented with regard to the viewer (Example).
Note: Billboard mode uses the Billboard feature of VRML97. Users with older viewers may need to use Standard mode.
A 'segmentochoron' is a special case of a polychoron (the 4-dimensional equivalent to a polyhedron). In a segmentochoron, the 4-dimensional vertices lie in a limited number of 3-D 'realms' and the polygonal faces in each of these realms is regular. They can be thought of as linked polyhedra.
HEDRON can generate segmentochora with polyhedra in up to 5 realms. Only one VRML output file is generated with each polyhedron shown in frame mode. (Example) However faces can be forced to a solid or translucent view by using the 's' and 't' face identifiers in the input file.
HEDRON will also output an 4-D OFF file in certain circumstances for Segmentochora. For the OFF file to be generated the Segmentochoron must be a valid polychoron with inter-realm faces defined (see below) and a valid polyhedron in each realm (realms containing points, lines and polygons are not supported at present).
If input data is entered for multiple polyhedra without any inter-realm links, then compounds can be obtained.
The input file to generate a segmentochoron is made up of two parts, firstly each polyhedron is defined as normal, including its bounding { }. Then the inter-realm links (if required) are defined with square brackets [ ].
The inter-realm links contain definition lines, these end in a -2 rather than a -1. A definition link tells HEDRON to which segment each of the following vertices belongs, a definition link of 1,2,-2, tells HEDRON that the first vertex in the following realm links are in segment 1 and the second vertex in segment 2. A number of definition links can be entered.
Two modes of inter-realm links are provided. A simple inter-realm line is drawn if two vertices are defined in an inter-realm link. An inter-realm face (similar in style to a frame face) is drawn if 3 or 4 vertices are defined in an inter-realm link. Realm lines and faces can be mixed in the same input file, however the number of vertices in an inter-realm link must be consistent with the last definition line.
A very simple example is this input file to define a tesseract (a "hyper-cube") with inter-realm lines. Two cubes are defined and the equivalent vertices in each are linked.
{ 'segment 1: cube 1
0FTR,1FT,2F,3F,-1, 'face 1 to the front with vertices 0 and 1 to the top, vertex 0 to the right
4,5,6,7,-1,
0,1,5,4,-1,
1,2,6,5,-1,
2,3,7,6,-1,
3,0,4,7,-1,
} ' end of segment 1
{ 'segment 2: cube 2
0FTR,1FT,2F,3F,-1, 'same orientation as cube 1
4,5,6,7,-1,
0,1,5,4,-1,
1,2,6,5,-1,
2,3,7,6,-1,
3,0,4,7,-1,
} ' end of segment 2
[ 'inter-realm links from here
1,2,-2, 'definition link: vertex 1 is in segment 1, vertex 2 is in segment 2.
0,0,-1, 'inter-realm line: link vertex 0 (in segment 1) to vertex 0 (in segment 2)
1,1,-1,
2,2,-1,
3,3,-1,2,1,-2, 'definition link: vertex 1 is in segment 2, vertex 2 is in segment 1. (doesn't make any difference but is included as an example)
4,4,-1, 'inter-realm line: link vertex 4 (in segment 2) to vertex 4 (in segment 1)
5,5,-1,
6,6,-1,
7,7,-1,
] 'end of realm links
This example is an input file to define a tesseract (a "hyper-cube") with inter-realm faces. Two cubes are defined and the equivalent edges in each are linked.
{ 'segment 1: cube 1
0FTR,1FT,2F,3F,-1, 'face 1 to the front with vertices 0 and 1 to the top, vertex 0 to the right
4,5,6,7,-1,
0,1,5,4,-1,
1,2,6,5,-1,
2,3,7,6,-1,
3,0,4,7,-1,
} ' end of segment 1
{ 'segment 2: cube 2
0FTR,1FT,2F,3F,-1, 'same orientation as cube 1
4,5,6,7,-1,
0,1,5,4,-1,
1,2,6,5,-1,
2,3,7,6,-1,
3,0,4,7,-1,
} ' end of segment 2
[ 'realm links from here
1,1,2,2,-2, 'definition link: vertices 1 and 2 are in segment 1, vertices 3 and 4 are in segment 2.
0,1,1,0,-1, 'inter-realm face: a "square" with vertex 0 in segment 1, vertex 1 in segment 1,
'vertex 1 in segment 2 and vertex 0 in segment 2
1,2,2,1,-1,
2,3,3,2,-1,
3,0,0,3,-1,
4,5,5,4,-1,
5,6,6,5,-1,
6,7,7,6,-1,
7,4,4,7,-1,
0,4,4,0,-1,
1,5,5,1,-1,
2,6,6,2,-1,
3,7,7,3,-1,
] 'end of realm links
9.1.1 Point, line and polygon segments
A special form of segment can be defined having only a single point at the origin, this is referred to as a 'point segment' and is entered as
{ P }
This input file example is for a simplex (the 4D equivalent of a tetrahedron) with inter-realm lines.
{ 'segment 1: tetrahedron
2,1T,0F,-1, 'vertex 0 to the front and vertex 1 to the top
3,2,0,-1,
0,1,3,-1,
1,2,3,-1,
} ' end of segment 1
{ 'segment 2: point segment
P
}
[ 'realm links from here
1,2,-2, 'definition link: vertex 1 is in segment 1, vertex 2 is in segment 2.
0,0,-1, 'realm links, link each vertex in segment 1 with the 0 vertex in segment 2
1,0,-1,
2,0,-1,
3,0,-1,
] 'end of realm links
A point segment can take a V vertex identifier and be highlighted with a sphere by entering it as { PV }
Line segments can be similarly entered using an 'L'. An orientation is required; this is achieved by following the L with one of X Y or Z to force the line segment into the respective axis. Options are:
{LX} - Line segment along the X
axis. 0 co-ordinate at X = -0.5, 1 co-ordinate at X = +0.5
{LY} - Line segment along the Y axis. 0 co-ordinate at Y = -0.5,
1 co-ordinate at Y = +0.5
{LZ} - Line segment along the Z axis. 0 co-ordinate at Z =
-0.5, 1 co-ordinate at Z = +0.5
Line segments can be scaled and translated as normal.
Line segments can also have both vertices highlighted with spheres by putting a V identifier before the closing bracket, e.g. { LXV }, and/or can be highlighted with a cylinder by putting an O identifier before the closing bracket, e.g. { LXO }, or { LXVO }
A segment can be defined as containing only a single polygon, the orientation of this polygon is handled differently from the normal orientation routine. In addition to the F (front), T (top) and R (right) identifiers, polygons can be locked into specific planes with the use of the following side identifiers:
X: locks the polygon
into the X=0 plane.
Y: locks the polygon into the Y=0 plane.
Z: locks the polygon into the Z=0 plane.
As for other side identifiers, the precise position of the letter is unimportant so long as it precedes the final comma. The directions HEDRON uses for its x y and z axes are illustrated below.
The following example defines a hexagonal segment in the z=0 plane with vertex 0 at the top and vertex 1 to the right:
{
0T,1R,2,3,4,5,Z-1,
}
One special note with regard to the X and Y identifiers, these are applied to the polygon before HEDRON generates it. It is therefore generated perpendicular to the screen and only a line will show. It will however appear normally in the output files.
All input flags can be used for faces of segments.
The following face identifiers can be used for inter-realm links:
s: Forces
the polygon to be displayed solid in all output files
t: Forces the polygon
to be displayed translucent (with an opaque frame) in all output files
Colour identifiers:
These force the face to the desired colour and over-ride all other colouring options.
a: amber ( orange)
b: blue
c: cyan
g: green
m: magenta
r: red
w: white (pale grey)
y: yellow
9.2 The Segments Options Screen
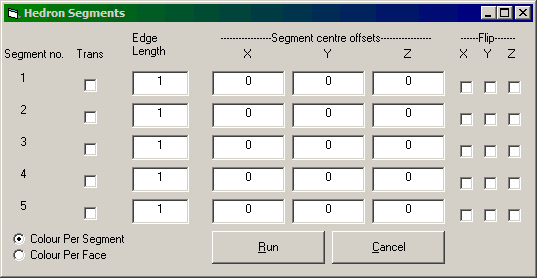
If multiple segments are detected in the Input File, then HEDRON will display a "Segments" button on the Runtime Options Screen. Pressing that button will display the above screen. Options can be entered for each segment, namely:
Trans: If this box is checked then translucent faces (inside the opaque frames) will be drawn for the segment.
Edge Length: This acts as a scaling factor for the segment.
Segment Centre Offsets: These act as translation factors for each segment.
Flip: Will reverse the signs of the respective co-ordinate on output. Effectively these reflect the segment making any F T and R vertex identifiers 'back', 'bottom' and 'left' identifiers.
Segments are scaled and then translated. Point and line segments can be scaled and translated.
Two examples: This tesseract has had the second segment scaled by a factor of 0.5, no offset is applied. This tesseract has had the first segment offset by (-0.2, -0.2, -0.2) and the second by (0.2, 0.2, 0.2), no scaling is applied.
The default colouring mode for segmentochora and compounds is "Colour Per Segment", segments will in turn be coloured red, blue, green, orange and magenta. Normal HEDRON colouring can be obtained by clicking "Colour Per Face".
Note that inter-realm faces are scaled to the Segment Edge Length. Compare these simplexes with Inter-Realm Faces: (A) the Segment Edge Length of the Point Segment is set to 0.0001, (B) the Segment Edge Length of the Point Segment is set to 1.
10. How HEDRON generates polyhedra
Processing is via a tension model. Starting locations for the vertices can be provided in the input or in the absence of these they are placed randomly in the box |x|<1, |y|<1, |z|<1. Depending on their relationship, vertices are then connected by virtual springs which attempt to move the vertices to be a pre-determined distance apart. A 'database' of edges and faces is then generated from the input.
It helps to think of this in three dimensions, as it appears to me that a different approach is needed for each dimension.
1-dimensional (edges): Vertices of the polygon that are directly connected are separated by one unit. For star polygons, vertices that are adjacent to each other are separated by a distance appropriate to the polygon.
2-dimensional (faces): In order to keep the faces coplanar and regular, the distance between opposite vertices of the regular polygon is calculated, each vertex is projected through the centre of the polygon to determine a desired location for the opposite vertex. The distance between these vertices should be equal to the major diagonal of the polygon. Odd faced polygons have a modification to this approach. A tension model is used to move the opposing vertex toward this desired position.
Rhombi have their own specific processing. The required diameters of each iteration (two per rhombus) are set to the average of the diameters from the preceding iteration. This not only allows the rhombic diameters to float (away from the diameters of a square) but also ensures that all rhombi in a model have equal diameters. As a check, the acute angle for each rhombus is written into the output file as a comment.
3-dimensional: The overall shape of the polyhedron needs a further force to be applied in order to distinguish between isomers. This can take varying forms:
(i) globally convex polyhedra: a "hop" algorithm is used, the shortest distance between vertices (counting along the edges) is determined. A tension model then attempts to place the vertices this distance apart. This inflates the polyhedron into a roughly spherical model, this additional force is then removed to let the 1 and 2 dimensional forces alone determine the final shape. (See also the Modified Hop Algorithm)(ii) local convexity: Models which are only locally convex (or are not convex at all) need a different treatment. The distance between the centres of edge connected polygons is determined and an additional force is used to place these centres a desired distance apart. Vertices of the relevant polygons are then moved proportional to the centres.
A factor can be applied here to force faces to have a particular relationship. Take for example the Icosahedron and the Great Icosahedron. They have the same net. Forces 1 and 2 cannot distinguish them. The Icosahedron can be generated in one of two ways, either by using global convexity or by using local convexity with a separation factor of ~1. The Great Icosahedron can be generated only by using local convexity with a separation factor somewhere in the region of 0.3
An area in which HEDRON is frequently used is the generation of 'near-miss' polyhedra. The term 'near-miss' is itself not well defined, but is generally accepted to mean that the polyhedron in question can be made, using cardboard, polydron or some similar modelling kit without any visible stress or distortion. However, when the polyhedron is modelled mathematically, it becomes apparent that it cannot be formed with truly regular faces.
HEDRON contains a number of tools to facilitate the generation of such polyhedra
Using the default settings, HEDRON will repeatedly attempt to model a polyhedron. If it is successful, it will try again, attempting to find a different isomorph to the original solution. For a near-miss, HEDRON will not find any solutions by this method. An alternative method is termed 'once mode'. Using this method, HEDRON will make one attempt to model the polyhedron, get to the point where any remaining stress is minimised, and write the output files at this point.
An added option is 'weaken mode'. This only has an effect when used in conjunction with 'once mode'. There is a convention when generating near-miss polyhedra that any distortion should be confined to the smallest possible faces. 'Weaken mode' does this. When using this mode, a 'weaken limit' can be set. HEDRON will then attempt to confine the distortion to only polygons with this number of sides or fewer.
11.2 Stress Maps and Distortion Reporting
Two options are provided to quantify any remaining distortion. The first, visual option, is to create a 'stress map'. This provides an output file with any distorted edges or polygons clearly marked with edge cones and side spheres proportional to the extent of the distortion. For more information on stress maps, see section 7.1.
The second option is that HEDRON will provide, within the output files, a summary of any remaining distortion. This is provided in a number of ways. The total remaining distortion of the edges, any remaining distortion across the diagonals of the polygons and an aggregate error in the internal angles of the polygons are all reported. For more information on distortion reporting, see section 7.2
If you are using 64 bit Windows 7 the file COMCTL32.OCX (contained
within the download package) goes in the windows/syswow64 directory.
Copy it into this directory and register it as follows:
C:\Windows\SysWOW64
regsvr32 comctl32.ocx